The new year is almost upon us, and I for one, feel optimistic.
2011 has been a hard year for the Kent family. Lots of work and not many pennies. All the government's cuts have eventually pushed us into a place where we have less coming in than going out.
I think that this is probably a positive thing. For me if no one else. Time recently spent never quite focusing on making a living has now morphed into focus. As Thomas Edison said "Discontent is the first necessity of progress". Well I am discontented, so here's to progress.
During a boom time it seems that lucky people make a success of things. In England people who bought their own homes at the right time, have sat back laughing. Londoners who bought their homes before the ridiculous house price inflation were able to buy up our country homes, no mortgage, money to spare. But now? In a recession (whilst some people will always be lucky) it really becomes more about you and your talents. To see the situation and find a way through it.
And if I can start my business and make money in a recession? Well then that does bode well for the future. A recession is a perfect time to start a business. After all if I need to borrow money (hoping not to) then I will only be able to achieve that with excellent prospects and a thorough business plan. It's no revelation that money has been leant too profligately. If a bank lends me money, I want it to be a safe bet.
Also it is a the start of a business where the focus is on getting it just right. You need to hone your skills. When better to learn than during a recession?
And when you've got it just right? Then grow,grow with the economy. Because as night follows day and day follows night, so too will there be a boom. And when that comes I want to be ready with a healthy business.
So here's hoping that 2012 brings knowledge and success to all those willing to work for it. Bring on the recession and sort the wheat from the chaff. Lets just hope that the storm passes quickly.
Good luck to all my readers in 2012!
Thursday 29 December 2011
Sunday 18 December 2011
How to Make edible Glue
This is a quick post of how to make edible glue. I imagine that there might be more ways but this is the technique I use.
1) Take a small ball of sugarpaste and place in a small microwaveable container (ramekin, egg cup, small jar)
2) Splash a few drops of water onto it (less water than paste)
3)Pop it into the microwave for 15 to 40 seconds depending on your wattage etc. Keep checking, it is done when the suagarpaste has dissolved.
4)Stir and use.
Simple!Cheap!
Christmas cake design, trees and stars
This is my 2011 Christmas cake. Actually remembered to photograph it this year!
I usually find Christmas cake design a challenge. Difficult not to be too tacky. This year I decided to make painting the cake my theme. I LOVE painting cakes. It is actually a fairly quick way to get a striking design.
Initially I thought to do a black cake with gold stars but this design eventually came together.
The stars are made from 26 gauge wire and flower paste. I just rolled out a thin (but not too fine) piece of flower paste and used my new star cutters to cut out different size stars. Then I dipped the end of the wire in glue and posted through the star. Allow to dry, and paint. (I will add a separate post to tell you how to make homemade edible glue)
In order to be safe it isn't wise to stick wires directly into your Christmas cake. You really need a flower posy pick. They're very cheap and available from your local florist or ebay. They're designed for adding real flowers to wedding cakes. You simply plunge it all the way into your cake and it prevents contamination and also forms a seal with the sugarpaste- as it is the sugarpaste that preserves your cake.
Once your stars are dry, plug the top of your pick up with a ball of sugarpaste and then push the wires through. Carefully bend the wires outwards until you are happy.
Hope you like it.


Wednesday 14 December 2011
Social Networking
I've finally joined Twitter. Seems that it is an essential way to promote your business. So follow me @RealRebeccaKent. ~Hoping against hope to get a camera for Xmas as finding it difficult to get any decent pics!
Thursday 1 December 2011
Felting Jumpers / sweaters
I am in love. In love with a new craft. Felting and upcycling old jumpers/ sweater. Tis the season to be shopping at jumble sales. I'd love to shop at charity shops (thrift stores) , but these days they are prohibitively expensive.
This week I have been mostly making children's booties and wristwarmers for a craft show this weekend.
For those of you new to felting old jumpers/ sweaters, here's a how to guide.
1. Get your hands on some old items, which must be more than 65% animal fibre (wool, cashmere, mohair).
2. Put them in you washing machine on a hot (60%) wash. Try to add other items to help agitate the wool, but don't forget that it is a)hot and b) the colours will run.
3. When you get them out, bundle them into the tumble dryer and wack them onto a hot programme. (I like to keep the lint and use to stuff other projects!)
NB People often say that you need to put the jumpers/ sweaters into pillowcases to prevent damage to the washing machine.
4. When you have removed the objects from the dryer check to see if you have felted them enough. A truly felted jumper/ sweater will not fray at all when cut. Incidentally I have never had a jumper felt in only one cycle, but then again I have a very modern machine.
So that's it really. Remember that when you are making your object, if you iron the felted fabric, it will stretch . So therefore iron it before you cut it out (but I prefer not to iron where possible because it makes it less fluffy)
Wednesday 2 November 2011
Fabric Bird in Patchwork style, PDF tutorial
I've not been blogging for a while because I've been working hard on my new PDF tutorial which I am selling on Etsy and hopefully some other sites.


So if you are interested in making one of these then pop to my etsy shop.
They made excellent table centre pieces for someone's wedding and proved to be so popular that they appeared in two magazines and a few blogs.
I hope to say more later, selling well so far so we'll see.
Monday 19 September 2011
Sugarcraft Wedding Cake
When downloading the new photos from the digital camera some strange photos were nestled amongst the new ones. Even though the card thought it was deleted, when I downloaded it onto lightroom some pictures from my brother's wedding appeared.


I was proud to be asked to make their wedding cake. Although in all honesty everyone else groaned, because sugarcraft can be quite a stressful occupation. It takes weeks to make all the flowers and leaves. Then when you've decided on an arrangement so many things can destroy it. Every cake I've ever made has had a series of disasters inherent within it. This one was no exception.
As the big day arrived I had a team of people knocking out ivy. Normally I have complete creative control, but time was not on my side. I prayed that when they were all together the overall effect would be convincing. It was. This was the cake that made me realise I had to let go. That everything couldn't always be perfect and people rarely notice the tiny mistakes.


The wedding was in a woods on a rainy day in October. 4 months of slaving away, sanding and moulding. Late nights -the occasional tantrum- and stress related insomnia. And I arrive on the site where obviously there's no electric, therefore no lighting. People could barely see the thing! I'd also failed to realise that the cake would essentially be kept outside. Anyone who sugarcrafts knows that unless it''s a sunny day, the damn thing will melt.
I have to admit I felt extremely upset. I realised I had quite possible wasted a lot of my time. I watched on as the michaelmas daisies- each with two layers of intividually crafted petals- melted in front of my eyes.

We quickly took the picture before it was too late!
In my brother's speech he had to tell everyone that the flowers were in fact made of sugar. I think the drooping daisies actually made it look more lifelike.
In the end, I was glad that I made the gesture for my brother and his wife. However, I learnt a valuable lesson. Don't invest your soul into a cake. It's not worth it. The harder I tried the more the flowers looked real, therefore why not just put real ones on it? I've made cakes since, but I know now that even if there's a crack in the central rose (always a crowd pleaser) people rarely even notice!
Christmas tree ornament
Every year I try to add some new ornaments to the tree. Obviously my favourite are those made by the children. Every year when my husband gets the Christmas box down from the attic, I get quite excited. It’s like seeing old friends. There’re always ones which I’ve forgotten about – and the memories come flooding back. I see myself in 30 years sitting in a fireside chair and looking at my Christmas tree. A memory of every past year.
This year one of my new ornaments is this Christmas robin. His PDF pattern is also going onto Etsy, as soon as there's some natural light for the photographs. He's the perfect size, like a large bauble. He'd make an excellent Christmas gift as well. Buy a decent size box (or make one out of cardboard), cover it in fabic or wrapping paper. Wrap the Robin in tissue and put it inside the box. After all, I think the most important thing about presents is the wrapping!

How to blog
I'm still researching the fundamentals of how to write a blog. It seems that crafters are highly prolific in this. Top tips seem to be
- Use bullet points.
- Keep it snappy
- Have an interesting point of view ;)
- Include keywords.
- Link to other bloggers.
Wednesday 14 September 2011


A Day spent in frustration.
Learning to edit my photos has not been a barrel of laughs. Photoshop's free trial didn't download properly and neither did something called "GIMP". When I tried to edit the photo online, I ended up with this.

Not entirely unpleasant but not the standard I am aiming for.
So I took some more pictures when the light was better and downloaded Lightroom. What a frustrating process that is. Not exactly user friendly. However I have managed to cobble together a photo of another or my fabric flower series. The Denim fabric rose. When I searched the internet for "how to make a fabric rose" I came across many tutorials. None of which were satisfying for a perfectionist like me. So I set about to design my own rose. Unlike the fabric daisies, the rose is not especially simple. In fact it takes quite a while and is a little fiddly.
However I believe it is totally worth it. If I were to make my own wedding bouquet then these roses would be perfect.

With cut edges, they fray ever so slightly. Giving that shabby chic look. I am a massive lover of denim, but I have made this rose in a variety of fabrics. I'll post a couple more when I've managed to edit the pictures. Let me know what you think.
Tuesday 13 September 2011
Fabric Flowers
Research of how to be a good blogger is underway. I know it wont be impressive to everyone, but already 11 people have logged on. And only 6 of those are friends of mine ;) Absolutely addicted to the stats.
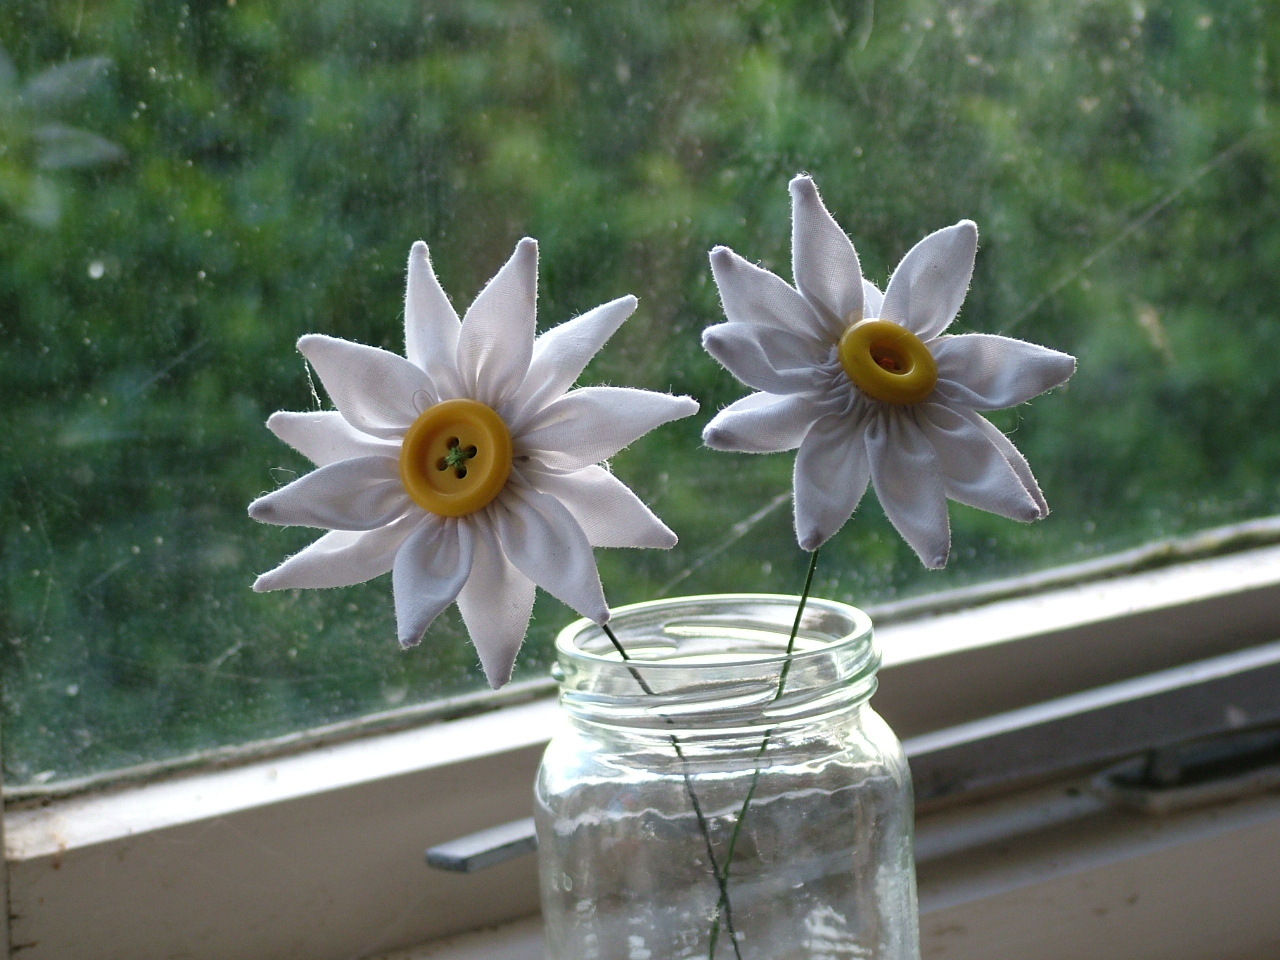
 My biggest fear for my blog is poor quality photos. Having recently designed a fabric and button daisy, I thought I'd have a go at photographing it. If it is popular I'll consider a post as a free tutorial. Here is the photo un-edited.
Going to download some free software and will repost the edited image.
Going to download some free software and will repost the edited image.
MiY first Blog
What percentage of blogs start with a blog about blogging? I've never really read any blogs, nor followed them either. I don't really know what is to be expected of me, or will anyone ever read this?
Perhaps I should explain my name. As for the ramblings, I assume that's fairly obvious. I was worried about it's "walking" connotations, however too long spent procrastinating over every decision is what always holds me back. So this blog is my new leaf. Some structure to encourage a progression in my work. What work? Well essentially craft -although I can't stand the word.
For years I've made endless objects, cakes etc. for friends, or just to solve a problem I was presented with. For instance, I was making my own clothes from age 9. Why? Because I was too tall! It's a different world now, where virtually every shop has a range of longer length trousers. But living in coastal Cornwall throughout the eighties and nineties meant that I couldn't get that latest fashions in my size (think ali barbar pants, baggy tartan trousers- cool dude).
Once a year a special trip to a basement in Exeter to buy special shoes (size 8/9 freaky clown).
So my mother showed me how to follow a sewing pattern and I was off. I don't spend much time making clothes any more. Unless it's a special occasion. I made my wedding outfit and the occasional skirt. It's no longer cheaper to make your own clothes. I love the left over trimmings but if you make a mistake ( me- never!) then the clothes start to cost more.
Now my clothes making experience is mostly used to make dressing up outfits, or to fix the rubbish I buy from Primark! I hope to share some of my children's outfits with you. It really is a rewarding pursuit.
So that explains the Ramblings (!). But what of the MiY? Well MiY stands for Make it Yourself. Pronounced My. I'm trying to develop a lot of my projects into patterns and tutorials. Some you will be glad to hear are free. Others will be available on Etsy, then afterwards hopefully on my own website. I would love to hear your comments on whatever tutorials I post. But please be kind.
Subscribe to:
Posts (Atom)